
I was staring at an old, scratched-up side table in my studio the other day: you know the one, a faithful IKEA find that has seen better years: and I realized it was the perfect candidate for a transformation. If you have been scrolling through interior design feeds lately, you have likely noticed that the world is currently obsessed with tiled furniture. What started as a niche "cool-girl" aesthetic has blossomed into a major 2026 trend that feels both architectural and incredibly grounded.
There is something so satisfying about a tiled piece. Unlike a standard wooden table, a tiled surface feels like a permanent part of the room’s architecture. It adds a layer of texture and weight that anchors a space, making it feel intentional and curated. But here is the best part: you don't need to drop hundreds of pounds at a high-end boutique to get this look. In fact, upcycling your existing furniture is often the most cost-effective and creative way to jump on this trend.
Whether you are looking to save a piece of furniture from the landfill or you just want to add some tactile charm to your living room, this guide will walk you through everything you need to know to create a stunning tiled table on a budget.
Why We Are Obsessed with Tiles in 2026
For a long time, tiles were relegated to the "splash zones" of our homes: the kitchen and the bathroom. However, we are seeing a massive shift in how we use materials. Interior designers are now using tiles to create "visual anchors" in living spaces. As noted by experts like Erin Sander, a tiled coffee table isn't just a surface for your remote; it’s a way to introduce texture and a sense of permanence into a room.
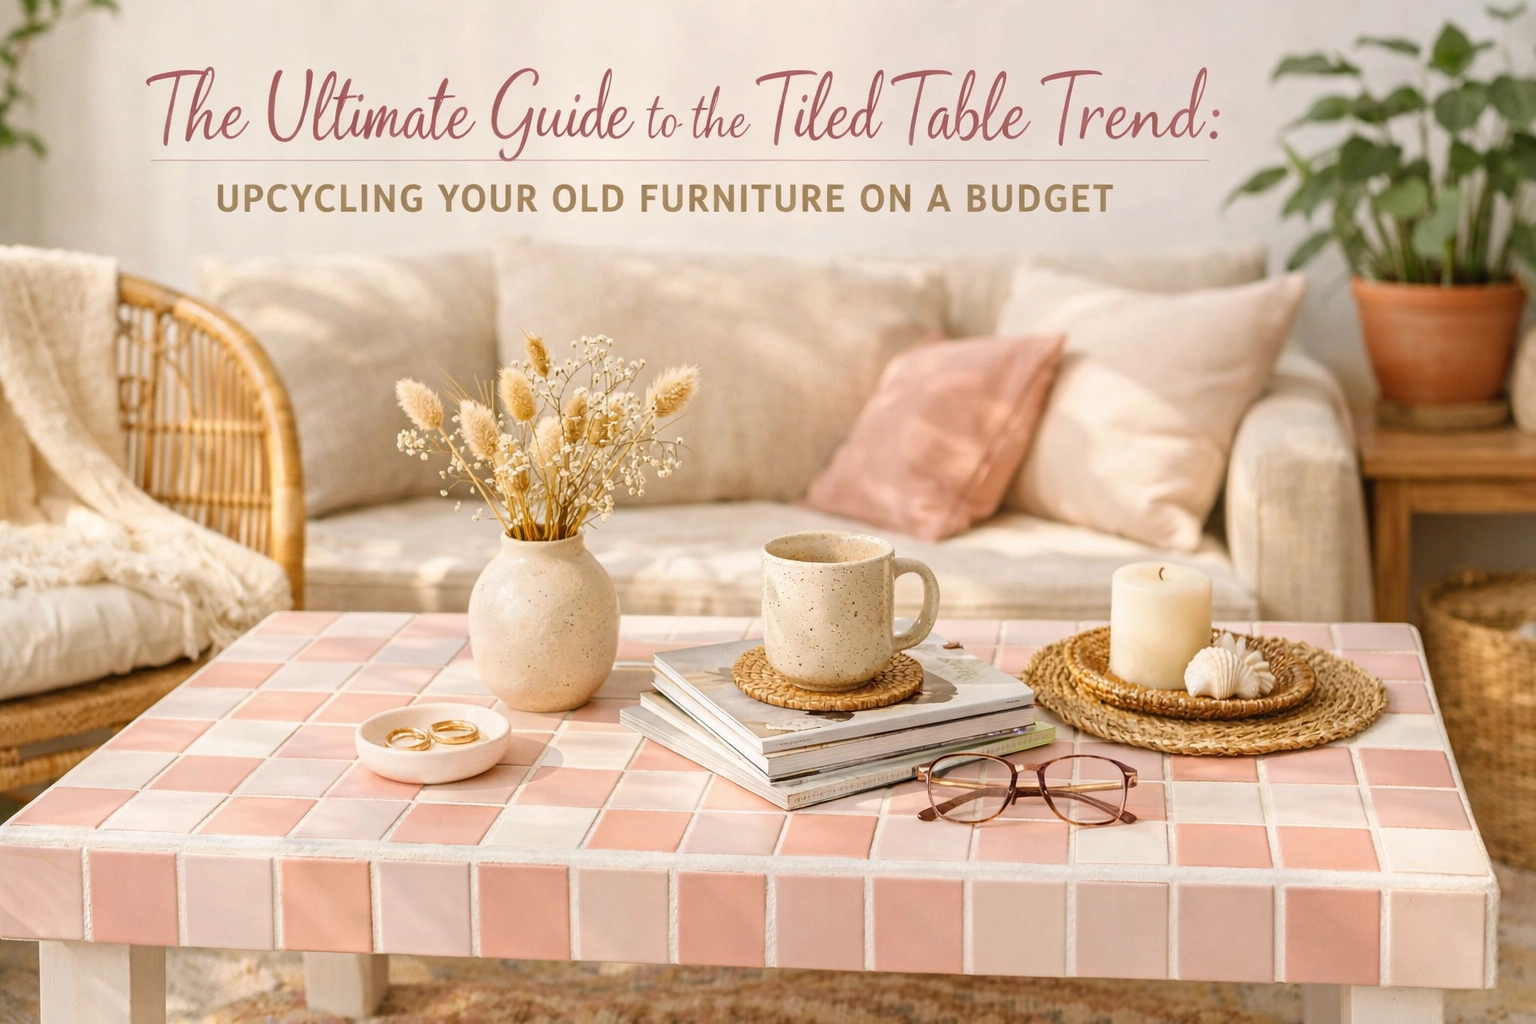
The 2026 aesthetic leans heavily into earth tones: think rich terra cotta, deep plum, and creamy sand. By choosing these palettes, you can create a piece that feels timeless rather than trendy. It’s about moving away from the "fast furniture" look and toward something that feels solid, bespoke, and uniquely yours. If you are new to the world of furniture flipping, you might want to check out The Beginner's Guide to Upcycling to get your confidence up before we dive into the tiling specifics.
Sourcing Your Canvas: The Art of the Upcycle
The secret to a great tiled table is starting with a sturdy base. You don't want to spend hours tiling a table that is wobbling on its last legs. Look around your home for coffee tables, side tables, or even plant stands that have a simple, boxy silhouette.
If you don't have anything suitable on hand, head to your local thrift store or check out online marketplaces. Look for pieces with straight lines and flat surfaces; avoid anything with too many curves or intricate carvings, as these are a nightmare to tile. A simple cube-shaped side table or a rectangular coffee table is the ultimate beginner-friendly "canvas."

Gathering Your Budget-Friendly Materials
One of the biggest misconceptions is that DIY tiling is expensive. While luxury tiles can certainly cost a pretty penny, you can achieve a high-end look using basic supplies found at your local hardware store or even on Amazon.
To keep things within a friendly budget, here is what you will need:
- The Base: An old table (free or thrifted).
- Tiles: Small square tiles (1-inch or 2-inch) are the easiest to work with. You can find beautiful options like these ceramic mosaic tiles that come on mesh sheets, which saves you a ton of time on spacing.
- Adhesive: A standard pre-mixed tile adhesive is perfect for small furniture projects.
- Grout: Choose a color that either matches your tiles for a seamless look or a contrasting color (like charcoal grout with white tiles) for a bold, graphic vibe.
- Grout Float & Sponge: Essential for a smooth finish.
- Sandpaper: To prep your furniture surface.
For those looking to save even more, consider checking out "mis-tint" or "end of batch" sections at tile shops. You can often find enough tiles for a small side table for next to nothing.
Step-by-Step: Transforming Your Table
1. Preparation is Key
Before you even touch a tile, you need to prepare the surface of your furniture. If your table has a glossy finish or is made of laminate, the adhesive won't stick properly. Use a medium-grit sandpaper to scuff up the entire surface until it feels slightly rough. Wipe it down with a damp cloth to remove all the dust.
2. The Dry Fit
This is the most important step! Lay your tiles out on the table surface without any glue. This allows you to see how the pattern will fit and whether you’ll need to cut any tiles (which we want to avoid if possible). If your table is slightly larger than your tile sheets, you can adjust the spacing between tiles slightly to fill the gap.
3. Applying the Adhesive
Work in small sections. Apply a layer of adhesive using a notched trowel. You want enough to hold the tile, but not so much that it oozes up between the gaps. Press your tile sheets firmly into the adhesive, ensuring they are level.
"The beauty of the tiled table trend lies in its imperfection. While you want your lines to be straight, a slightly handmade feel adds to the charm and character of an upcycled piece."
4. Grouting the Masterpiece
Once your adhesive has dried (usually 24 hours), it’s time to grout. Spread the grout over the tiles using your float, pushing it deep into all the crevices. Let it sit for about 15-20 minutes, then take a barely damp sponge and wipe away the excess. You will need to do this a few times to get rid of the "haze" on the tiles.

Styling Your New Statement Piece
Now that your table is finished, it’s time for the fun part: styling! Because a tiled table has a lot of texture, you want to balance it with softer elements.
Consider placing a soft linen runner over a portion of it, or styling it with organic shapes like a round ceramic vase or a stack of vintage books. If you are working with a small space, like a renter-friendly balcony, a tiled side table can act as a weather-resistant and stylish surface for your morning coffee.
For those who want a more "boutique hotel" vibe, try incorporating some high-end looking Amazon finds to sit atop your new creation. A brass candle holder or a sleek tray can instantly elevate the DIY look.
Pro Tips for a Polished Finish
- Mind the Edges: If you are tiling the sides of the table, always start from the top and work your way down. Ensure the top tiles overhang the side tiles slightly for a professional, "wrapped" look.
- Seal the Grout: Especially if you plan on using the table for drinks. A simple spray-on grout sealer will prevent stains and keep your table looking fresh for years.
- Think Beyond the Coffee Table: This technique works wonders on plant stands, the tops of old dressers, or even as an inset for a refreshed entryway console.

Embracing the Creative Journey
Upcycling is more than just a way to save money; it is an act of creativity that turns the "ordinary" into the "extraordinary." This tiled table project is the perfect weekend activity to refresh your home without the environmental impact of buying new.
When you look at your finished piece, you won't just see a table; you'll see the time you spent planning, the care you took in laying each tile, and the unique style you brought to your home. It’s these personal touches that truly make a house feel like a "Charming Homescape."
If you find yourself inspired to keep the DIY momentum going, why not look into other ways to refresh your space? Perhaps a budget-friendly windowsill herb garden to sit near your new table, or some sustainable cleaning swaps to keep your newly tiled surface sparkling.
The world of home decor is yours to explore, one tile at a time. I can't wait to see what you create!
Warmly,
Maria.
P.S. For more budget-friendly ideas and cozy vibes, come hang out with us on our Charming Homescape Pinterest boards!
Leave a Reply